
Based on my experience on previous projects, I decided to write an article on how to properly set up the base architecture of an android app which can be easily extended and applied to different kinds of applications.
The key concept that I’ll analyze in this series of articles involves the combination of Clean Architecture, app modularization, and MVVM design pattern in creating a modular, scalable, and testable android application. For that purpose, I created a demo application called WeatherApp that will demonstrate this approach. The whole app is written purely in Kotlin, with Android Jetpack components such as LiveData, Navigation, ViewModel… Regarding dependency injection, I’ll use Dagger2. For performing complex threading operations, maintaining synchronization, error handling, getting results back to the UI thread and so on, I will use RxJava2.
In this first article, I’ll try to give an overview of modularization, Clean Architecture, and MVVM. Furthermore, I’ll explain how app modularization is useful and how we can combine those three software design techniques to create a high-quality and scalable Android application. Also, I’ll describe the demo application WeatherApp, create an initial package structure for it and show how to deal with multiple Gradle files.
What is Modularization and why you should use it?
Modularization in Android apps represents a software design pattern that separates functionalities into modules. Each Android application can be modularized by dividing the application module into library modules. The library module will have its resources, manifest file, and classes. In the end, the build tool will merge it into a single APK.
There are a few reasons why you should consider applying modularization to your application if you haven’t already:
- Faster build time (once you add your first module you should edit your gradle.properties file with this line: org.gradle.parallel=true – it uses all cores on your machine to build modules in parallel. Right-click into any folder in the project in Android Studio->Load/Unload Modules will open a screen where you can unload modules that you are not using and avoid their compilation).
- Code ownership
- Faster Continuous Integration
- App bundles – Dynamic features
Each modularized app should have:
- Core or base module (it should contain pure infrastructure without any domain knowledge).
- Feature modules (they are owned by a single team and they represent single features, the smaller they are, the better. The most important thing about feature modules is that they can NOT depend on other feature modules).
- Library module (can be shared between features).
- App module (in this module there’s no feature or infrastructure specific code, and in this module, we need to create app Dagger component).
The main point is to modularize by feature. When your features become bigger you must split them into smaller ones, and the code, which is shared or coupled between features, you can resolve with plugin pattern. It is important to mention that features can’t depend on each other but in most cases, they need to communicate. The concept that I prefer for feature to feature communication is known as string-based navigation, it consists of navigation directory which doesn’t depend on anything and it receives only primitives like IDs and return nullable intents. I will further explain this through a concrete example in our WeatherApp.
What is Clean Architecture?
The concept of Clean Architecture was originally proposed by Robert C. Martin, known also as Uncle Bob. The main goal of this approach is the separation of concerns, to separate your code into independent layers and design it to depend on abstractions instead of concrete implementations.
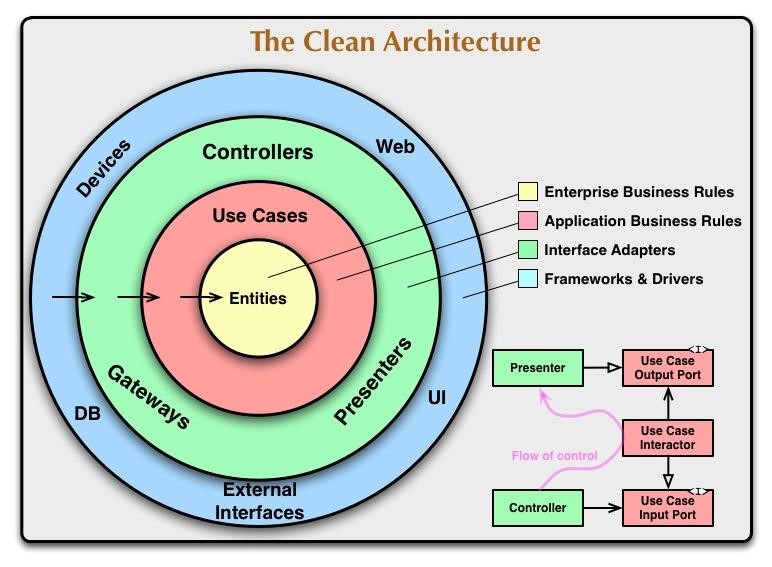
By observing the famous “onion” image above, we can see on the horizontal line how dependency flow looks like. Based on the arrow’s direction we can see that Use Cases depend only on Entities and Entities do not depend on anything and so on…
“We should think about our applications as a group of use cases that describe the intent of the application and group of plugins that give those use cases access to the outside world” – Uncle Bob
The main reason why we should use Clean Architecture in our Android applications is that if we set it properly we will end up with an application that is independent of frameworks and libraries, independent of UI, and maybe most important – independent of data sources. There are three layers:
- Data layer (Network data source, Disk data source)
- Domain layer (Entities, Use Cases, Business logic)
- Presentation layer (Activities, Fragments, UI logic)
What is MVVM?
Model-view-viewmodel is a software design pattern consisting of three layers:
- Model (in our architecture in combination with Clean Architecture refers to a domain model, which represents a real state content).
- View (activities, fragments, it displays data received through view-model).
- View Model (the View Model represents an abstraction of the view, it receives data from Model, perform necessary UI logic and then expose appropriate data to the View, alongside with that, View Model manipulate the Model based on actions on the View. The View has a reference to a View Model but View Model doesn’t know anything about the View).
WeatherAPP – concrete example
To demonstrate how to design an application based on those above software architecture techniques I created a simple app called WeatherApp. The app will parse local JSON with dummy data in the Data layer and through Domain layer display results in the Presentation layer. The app will have two simple features (getting weather and displaying it on the main screen and Settings feature for changing the theme and whether unit). I created a feature Settings just to show how string-based navigation works between two features. Based on that information about the app we can create a new project from Android Studio and an initial package structure.
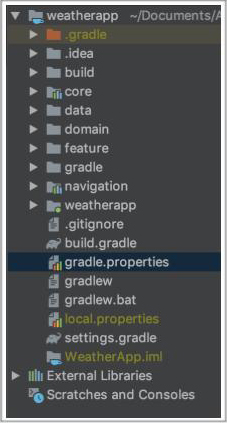
Once the project is created rename the app module to WeatherApp. This module will be responsible for linking all feature modules together. The next step is to create a core module. Right-click the project then New/Module and select Android Library, change library and module name to “core” or “base” if you want, select minimum SDK 21, Kotlin should be selected by default and then click finish. This core module will be responsible for providing dependency to all other modules. Every module (WeatherApp, features, libraries) should implement the core module. (I’ll show how it looks in the WeatherApp later). The next step is to create a navigation module for navigation between features. Again click New/Module, select Android Library, change the name to navigation and click finish. After adding the core and navigation module, create three directories: data, domain, and feature. Finally, the project structure should look like this:
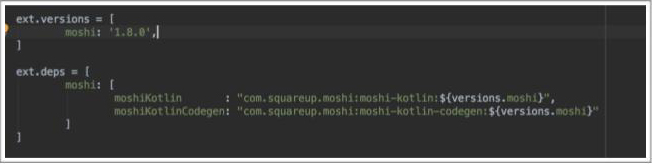
The next major and important step is to set gradle files. The first file that needs to be modified is the main build.gradle. Inside buildscript create ext.versions = [] and ext.deps = [].
Inside ext.versions = [] add versions for each dependency and in ext.deps = [] add dependency with appropriate versions. If you set up your gradle properly you don’t need to worry about versions of individual libraries because they all come from a central point. Here is an example for Moshi library:
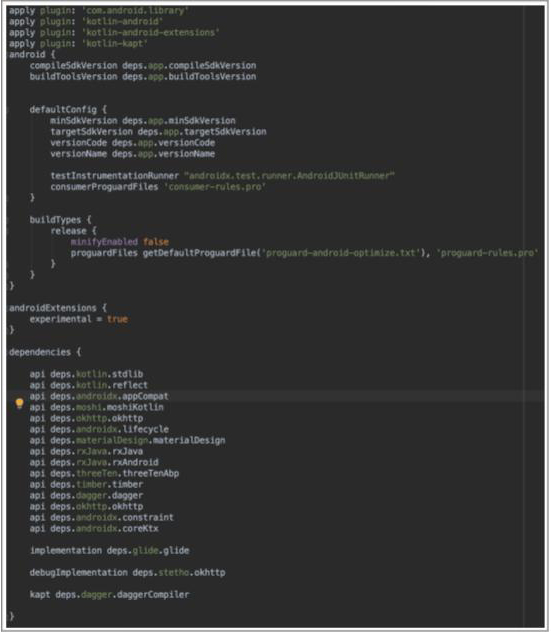
After you add all dependency the same way in the main build.gradle, the next step is to modify build.gradle in the core module. The core module will be responsible for providing dependency for each module in WeatherApp so it needs to look like this:
When core build.gradle file is finished, the next step is to modify build.gradle files of our modules (WeatherApp and navigation) that will implement dependencies from the core module.

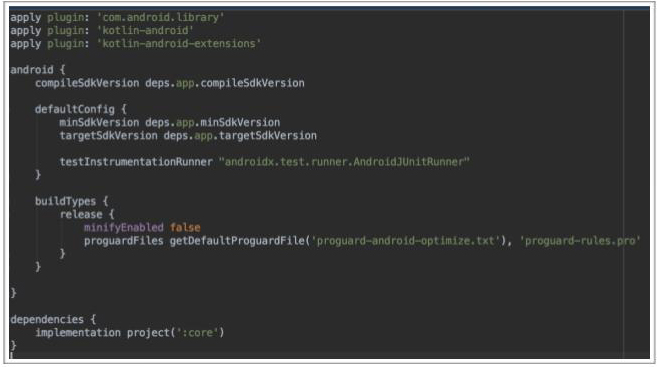
Navigation module build.gradle:
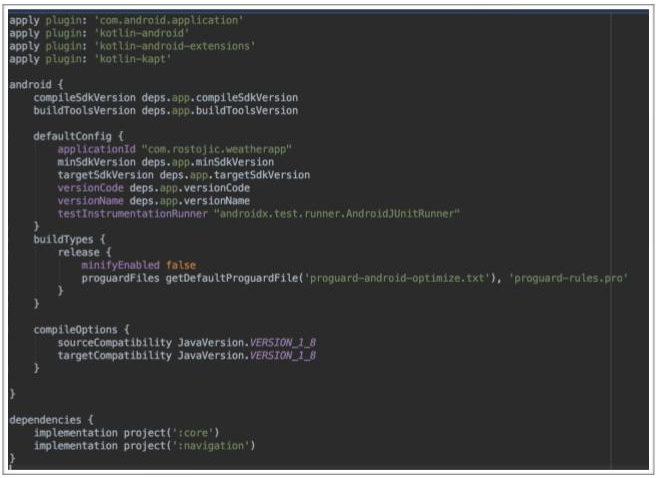
It is important to highlight that the WeatherApp module will implement all other modules in our app, so at this moment we have only navigation and core. Once we add feature modules we will need to update this gradle file.
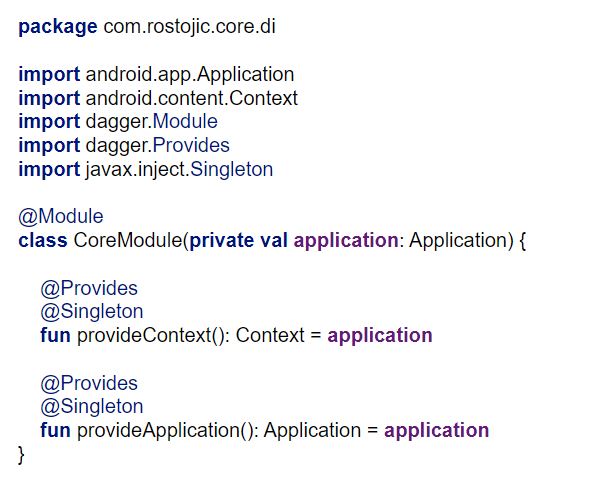
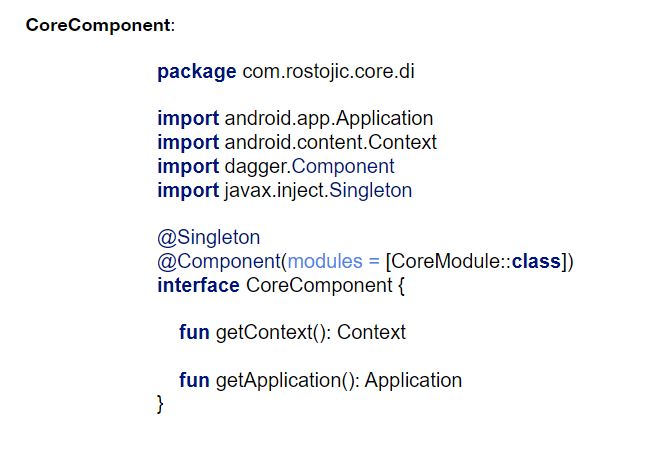
Before we add the first feature, we need to set up WeatherApp and the core module, in the core module under main/java package create dependency injection package called di. As I mentioned above, for dependency injection I will use Dagger2 because it’s much better than Koin for multi-module projects, in my opinion. Based on that, we need to create CoreModule and CoreComponent at the beginning:
CoreModule will for now provide context and application:
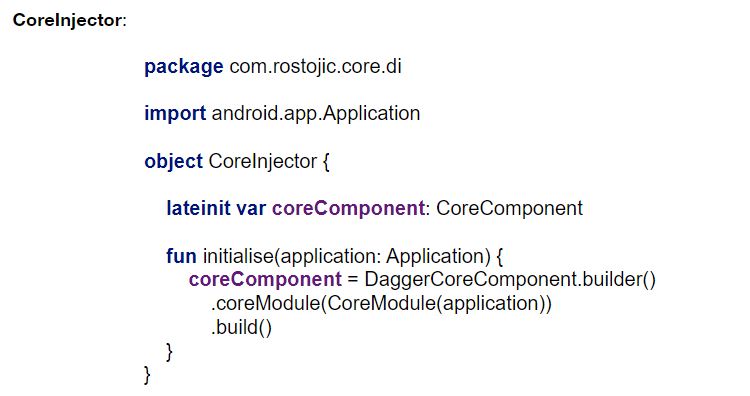
Besides the CoreModule and CoreComponent, we need to create one more file, more precisely, an object called CoreInjector. In this object we need to create a public function initialise() which will build DaggerCoreComponent from WeatherApp module:
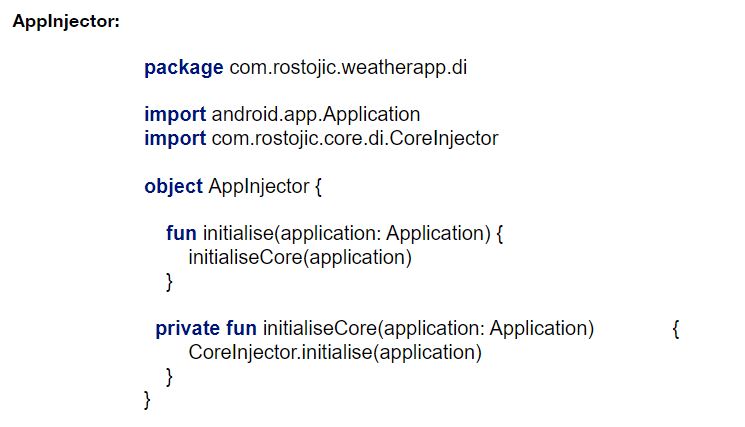
Now in the WeatherApp module create di package under main/java/ and inside this package create another object called AppInjector. This object is responsible for initializing Dagger component at the app level for each module:
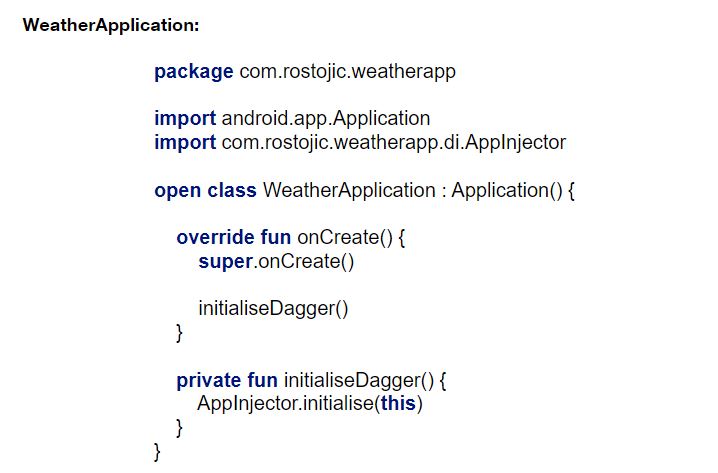
And finally, we need to initialize this in our application class inside the WeatherApp module, in our case WeatherApplication.
Before we create our first feature we need to set up a navigation module. In the navigation module, we need to create two files, one for loading a class based on id (in our case loading activity, also there is possible to load fragment or service) and one for providing nullable intent.
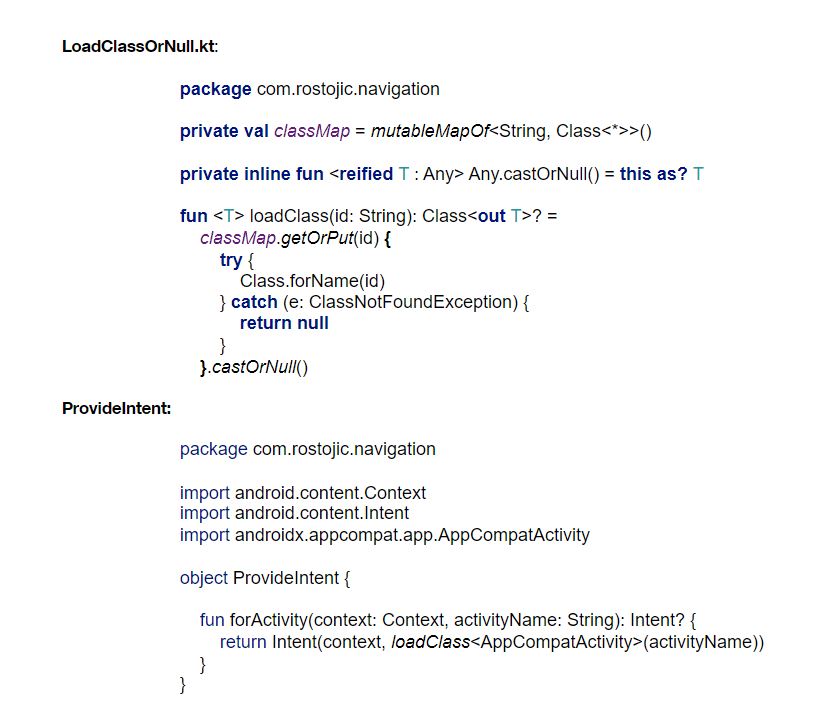

Class ProvideIntent will be used for navigating between features, calling forActivity() feature will get the intent of the required activity or it will get null.
In the next article, I’ll create the first feature for fetching dummy data, as Uncle Bob described, I will start from the most inner circle – domain layer. I will create a domain module for that particular feature inside the domain directory and set dependency injection for it, use-case, repository, and entity.