

In the previous article, I described the Domain layer in detail and provided concrete code snippets of how to implement it to be a crucial part of our architecture. In this article, I will try to explain what is Data layer and how we can add this layer to our architecture. As I have mentioned in previous articles, we have separate directories for each Clean Architecture layer (data, domain, feature or presentation) and inside each of them we will have modules for each feature, so based on that, in data, we need to create a new module called data_weather for our weather feature.
What is the Data layer, and how we can implement it in our WeatherApp?
The Data layer is the place where the app needs to deal with APIs and 3rd party libraries. It contains Repositories – the single source of truth for the data, Models, and Data Sources (which can be local or remote). Before we start implementing the Data layer in our application, we need first to take a look at Uncle Bob Clean Architecture image:
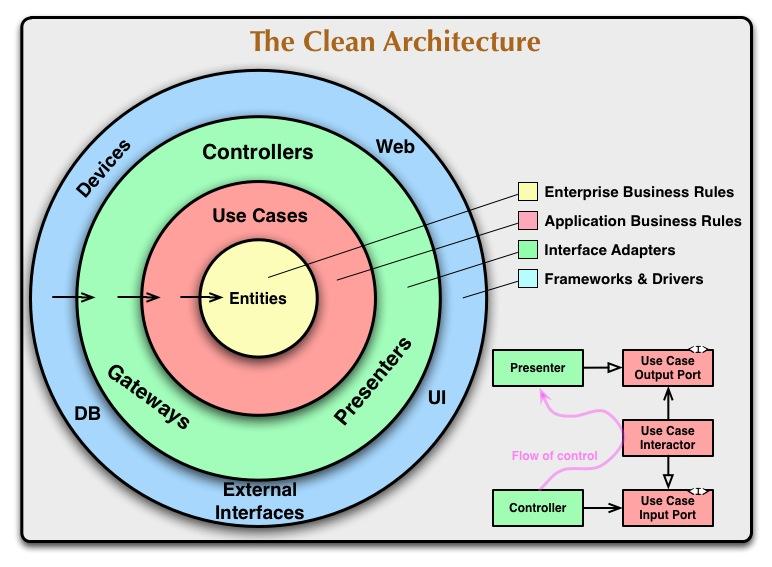
Based on this image and my previous article, we can see that there is one base principle that outer layers depend on inner layers, thus, we always start working from the internal parts of the app (for example if we first implement UseCase, how can we return Entity if we didn’t implement it before?). After all, in the previous article, we started with an entirely independent Domain layer for our weather feature, more concretely, we began by implementing Entity, and we will continue to follow the same principle with the Data layer.
For now, in order not to make our app more complex, we will implement a parsing local JSON file called weather.json to get the required data. Later in the next articles, we will switch this for an actual API call to Apixu Weather using Retrofit. In that case, we will show how easy it is to change data sources without affecting the business logic and UI logic of our application if our architecture is correct.
In the directory, data create a data module for our feature called data_weather. Modify build.gradle file to implement core and domain_weather modules:
dependencies {
 implementation project(':core')
 implementation project(':domain_weather')
kapt deps.dagger.daggerCompiler
}
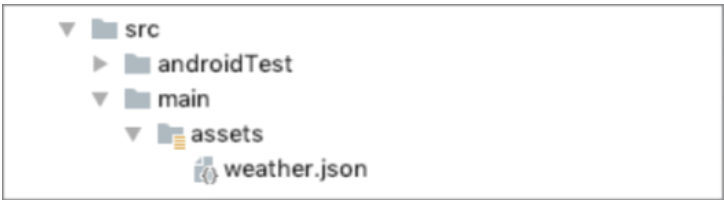
As we mentioned earlier that data_weather would depend on domain_weather module, and it will implement necessary dependencies from the core module. The next step is to create a dummy JSON file. Under leading create assets directory and inside it create dummy JSON called weather.json. Package structure should look like this:
Inside weather.json add dummy values:
{
 "city": "Novi Sad",
 "dateTime": "Sun, Septembar 8, 08:65",
 "weatherImage": "https://openweathermap.org/img/wn/10d@2x.png",
 "temperature": "17°",
 "feelsLike": "23/11 Feels like 17°C",
 "description": "Cloudy",
 "precipitation": "Moderate",
 "uvIndex": "40%"
}
Now we can create a repository. Inside main/java create a package called a repository, and inside it create an interface called WeatherRemoteDataSource. This interface will be a contractor to our fake data source. For now, it should have only one method getWeather(), which will return Single<Weather> because we are returning only one Weather object for now. When we switch data sources, we will change this returning type to Flowable<List<Weather>> to support back pressuring and to return a list of Weather objects.
WeatherRemoteDataSource:
package com.rostojic.weather.repository
import com.rostojic.weather.model.Weather
import io.reactivex.Single
interface WeatherRemoteDataSource {
fun getWeather(): Single<Weather>
}
The next step is to create a repository implementation class inside the same package called WeatherRepositoryImpl. This class will implement the WeatherRepository interface from our domain layer, in our case from domain_weather. Before we start coding our WeatherRepositoryImpl, we need to set a dependency injection for our data module. Inside main/java create package called di. First, we will scope class called WeatherDataScope:
package com.rostojic.weather.di
Import javax.inject.Scope
@Scope
@Retention(AnnotationRetention.RUNTIME)
annotation class WeatherDataScope
After we create a custom scope class for our data module, we need to create a module class, called WeatherDataModule. This module class will provide weather.json path for now:
package com.rostojic.weather.di
import com.rostojic.weather.repository.WeatherRepository
import com.rostojic.weather.repository.WeatherRepositoryImpl
import dagger.Binds
import dagger.Module
import dagger.Provides
import javax.inject.Named
@Module(includes = [WeatherDataModule.BindModule::class])
class WeatherDataModule {
@Provides
 @WeatherDataScope
 @Named("weather_json_path")
 fun provideJsonPath(): String = "weather.json"
@Module
 interface BindModule {
@Binds
 fun bindRepository(repository: WeatherRepositoryImpl): WeatherRepository
 }
}
Later, when we implement a fake data source, we will update this module to provide an instance of a data source. Next is a data component. This component should extend CoreComponent, which we created in the previous article, and is annotated with WeatherDataScope. This component will have only one method, which will provide WeatherRepository instance. Let’s call this component WeatherDataComponent:
package com.rostojic.weather.di
import com.rostojic.core.di.CoreComponent
import com.rostojic.weather.repository.WeatherRepository
import dagger.Component
import javax.inject.Provider
@WeatherDataScope
@Component(modules = [WeatherDataModule::class], dependencies = [CoreComponent::class])
interface WeatherDataComponent : CoreComponent {
fun getWeatherRepository(): Provider<WeatherRepository>
}
And final part for dependency injection in this module is to create object WeatherDataInjector:
package com.rostojic.weather.di
import com.rostojic.core.di.CoreInjector
object WeatherDataInjector {
lateinit var component: WeatherDataComponent
fun initialise() {
 component =
 DaggerWeatherDataComponent.builder().coreComponent(CoreInjector.coreComponent).build()
WeatherDomainInjector.initialise(
 component.getWeatherRepository(),
 component.getSchedulerProvider()
 )
 }
}
I described the purpose of this object in previous articles so we can call method initialize () inside AppInjector in weatherapp module:
private fun initialiseWeather() {
 WeatherDataInjector.initialise()
}
Once we set dependency injection we can go back to WeatherRepositoryImpl and provide an implementation for WeatherRepository interface, note that we will inject WeatherRemoteDataSource and SchedulerProvider through the constructor, on the same way that we did it in domain layer:
package com.rostojic.weather.repository
import com.rostojic.core.rx.SchedulerProvider
import com.rostojic.weather.model.Weather
import io.reactivex.Single
import javax.inject.Inject
class WeatherRepositoryImpl @Inject constructor(
 private val remoteDataSource: WeatherRemoteDataSource,
 private val schedulerProvider: SchedulerProvider
) : WeatherRepository {
 override fun getWeather(): Single<Weather> {
 return remoteDataSource.getWeather()
 .subscribeOn(schedulerProvider.io)
 }
}
Finally, we can implement our fake data source. Create package remote inside main/java and class FakeRemoteDataSource in it. This class will implement WeatherRemoteDataSource, and inside the overridden method getWeather(), we will return RxJava Single Weather instance parsed from local JSON by using library called Moshi. Moshi instance, context, and weather.json path will be injected through the constructor. Note here that we provided Moshi instance and context from the core module but weather.json path from WetherDataModule:
package com.rostojic.weather.remote
import android.content.Context
import com.rostojic.weather.model.Weather
import com.rostojic.weather.repository.WeatherRemoteDataSource
import com.squareup.moshi.JsonAdapter
import com.squareup.moshi.Moshi
import io.reactivex.Single
import java.io.InputStream
import javax.inject.Inject
import javax.inject.Named
class FakeRemoteDataSource @Inject constructor(
 private val context: Context,
 private val moshi: Moshi,
 @Named("weather_json_path") private val jsonPath: String
) : WeatherRemoteDataSource {
 override fun getWeather(): Single<Weather> {
 return Single.create<Weather> {
 val jsonAdapter: JsonAdapter<Weather> =
 moshi.adapter<Weather>(Weather::class.java)
 val inputStream: InputStream = context.assets.open(jsonPath)
 val inputString = inputStream.bufferedReader().use { reader -> reader.readText() }
 val weather = jsonAdapter.fromJson(inputString)
if (weather != null) {
 it.onSuccess(weather)
 } else {
 it.onError(RuntimeException("Could not fetch weather"))
 }
 }
 }
}
Now when we have FakeRemoteDataSource implementation, we can go back to our WeatherDataModule and update it to provide data source:
@Provides
fun provideWeatherRemoteDataSource(
 context: Context,
 moshi: Moshi, @Named("weather_json_path") jsonPath: String
): WeatherRemoteDataSource {
 return FakeRemoteDataSource(context, moshi, jsonPath)
}
With this change, we are done with our data module. In this article, I described what the data layer is and how we can implement it to fit our needs. Designing a data layer like this can help us to avoid problems in the future when we want to change the source of our data and do not affect the whole application. In my upcoming articles, I will write on how we can replace this FakeRemoteDataSource with an actual API call to Apixu weather using Retrofit. In the next section, I will describe and implement the presentation layer.